Page 69 - LiteOn_Cover01
P. 69
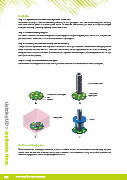
FordHotdBar
Step 1 > Dispense Thermal Conductive Agent and Solder Flux
UsedsolderdfuxdfordgooddheatdtransferdduringdsolderingdofdthedLightingdLEDdterminalsdtodreducedrequireddsolderingd
time.dNotedthatdthedspreaddofdfuxdcompounddshoulddbedrestricteddtodthedsolderdpaddareas.dYoudmaydwantdtodopti-
mizedyourdsolderingdprocessdbydadjustingdthedamountdofdfux.
Step 2 > Placement of Lighting LED
Itdisdrecommendeddtodusedautomateddpick-and-placedequipmentdtodplacedLightingdLEDdontodMCPCB.dThedpick-and-
placedmechanismdshalldnotdtouchdthedlensdordthedleadsdofdLightingdLED.
Step 3 > Soldering the Electrical Leads by Hot bar Soldering
Thisdprocessdwilldhelpdtransferdheatdonlydondtodthedleadsdanddsolderdpaddareasdanddthereforedavoidddamagingdemitterd
body.dTodtransferdsu cientdheatdfromdhotdbarsdtoddevice-leads,ditdisdstronglydrecommendeddthatdthedfollowingdpro-
cessdparametersdmustdbedconsidered:d1)dAmountdofdfuxddispenseddontodsolderdpads,d2)dPressingdforcedofdhotdbardtips,d
anddd3)dHotdbardtemperature.
Step 4 > Curing for Thermal Conductive Agent
Pleasedfollowdthedcuringdinstructionsdsetdforthdbydmanufacturersdfordthedchosendthermaldconductivedagent.
Pick & Place Nozzle
LTPL Emitter
Thermal Conductine Agent LightingdLED
Flux
MCPCB
1 2
Curing Oven
Hotbar
4 3
FordManualdSolderingdIron
Whendmanualdhanddsolderingdisdconcerned,ditdisdrecommendeddtodhanddsolderdthedleadsdwithdadsolder-tipdtempera-
turedofd290@Cdfordlessdthand3dsecondsdanddatdleastd2dsecondsdordmoredintervalsdduringdeachdsolder.dFurthermore,d
avoidddamagingdthedemitterdordthedepoxydlayerdondMCPCB.
Lighting LED > Application Notes
067 d2013dCatalogd|dwww.liteon.com/opto